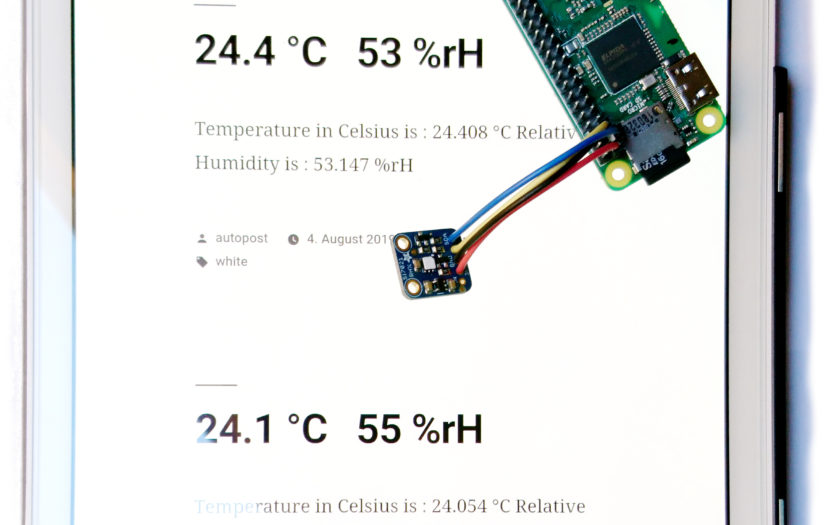
To finally do some hardware stuff again, I decided to create a simple weather station using one of these very small Raspberry Pi Zero modules. To publish the measurements to, I chose to use a WordPress site because it’s public, secure and (quite) simple.
Parts list
- An Si7021 sensor (Data sheet)
- Some wires and a soldering iron
- Raspberry Pi (e.g. Zero W or WH Kit)
- some lines of Python
- WordPress site with XMLRPC enabled (It is by default).
To keep the weather station lightweight, I recommend a headless setup.
Setting up the Si7021 sensor
For the cabling: see the Si7021 sensor example on PiBits. To enable readings via I2C, you must enable the I2C interface via raspi-config.
sudo raspi-config
#select the Interfacing Options, then enable I2C
Then, to get full-resolution data, have a look at my other post on https://qrys.ch/reading-14bit-from-an-si7021-temperature-and-humidity-sensor/. It requires the use of the PiGPIO library and it’s daemon. To enable the PiGPIO daemon and get a test reading, do in the terminal:
# installing pigpio first
sudo apt-get install pigpio python-pigpio python3-pigpio

# get the Si7021.py script
wget http://abyz.me.uk/rpi/pigpio/code/Si7021_py.zip
unzip Si7021_py.zip

# start the pigpiod daemon; -l disables the remote socket interface, it's not needed to read a local sensor
sudo pigpiod -l

# start the main function in the module, as a test
python3 Si7021.py

# stop the daemon, if no longer used
sudo killall pigpiod
Posting to WordPress
Sina Jahangiri has an excellent post about how to use Python to write a post in your WordPress website/blog . To write the posts, I used the XML-RPC API of wordpress. It’s available at https://your.domain/xmlrpc.php
Note: while simple in use, the safety of XML-RPC in WordPress is disputed. Learn more about XML-RPC and specifically XML-RPC in WordPress.
First, make sure the library is available to your Raspberry Pi.
# Installing python3 (if not available, e.g. in Raspian Lite)
sudo apt-get install python3

# Installing pip (if not available)
sudo apt-get install python3-pip

# The WordPress XML-RPC API
pip3 install python-wordpress-xmlrpc

# For YAML configuration
pip3 install pyyaml
This will install the client library for accessing the XML-RPC interface on your WordPress blog. Then, you can use this python code to actually write a post as a test:
from wordpress_xmlrpc import Client
from wordpress_xmlrpc.methods import posts
from wordpress_xmlrpc import WordPressPost

blog = Client('https://your.domain/xmlrpc.php', 'USERNAME', 'PASSWORD')

post = WordPressPost()
post.title = 'MY_POST_TITLE'
post.slug='MY_POST_PERMANENT_LINK'
post.content = 'YOUR_POST_CONTENT'
post.id = your_blog.call(posts.NewPost(post))
post.post_status = 'publish'
blog.call(posts.EditPost(post.id, post))

print(post)
Put the parts together
Now, for a working weather station, you’ll need
- a bash script that starts the pigpiod daemon and invokes the measurement python script
- The Python script then initiates a masurement and sends the results to a WordPress blog, using a YML configuration.
You’ll find all of it in the from the WeatherPress GitHub Repository
Installation
To install the weather station from scratch, after the Raspberry Pi, the sensor and a WordPress blog have been prepared, you can just clone from the from the WeatherPress GitHub Repository:
# get git (Not included in the raspian lite version)
sudo apt-get install git

# clone the WeatherPress repo
cd /home/pi
git clone git://github.com/suterma/WeatherPress
cd WeatherPress
sudo chmod u+x RunWeatherPress.sh
Provide credentials and labelling in WeatherPress.config.yml.
sudo nano WeatherPress.config.yml
The you can test out the weather station:
./RunWeatherPress.sh
Post periodically
The weather station should post a new value every 15 minutes. (For details see how to run scripts from the terminal using this guide.)
Open crontab for the current user:
crontab -e
In the crontab file, add the following line to change directory to the WeatherPress clone and start it:
*/15 * * * * cd /home/pi/WeatherPress && ./RunWeatherPress.shCredits
Most of this work is based on other people’s work, notably:
- PIBITS: Raspberry Pi and SI7021 sensor example
- Joan at abyz.me.uk: Si7021 reader and PiGPIO daemon
- Sina Jahangiri: How to use Python to write a post in your WordPress website/blog