
This is mainly an iteration of a previous post A Raspberry Pi-based weather station, posting to WordPress (see there for details on the sensor) but this time publishing to an MQTT topic.
Setting up the Si7021 sensor
For the cabling: see the Si7021 sensor example on PiBits. To enable readings via I2C, you must enable the I2C interface via raspi-config.
sudo raspi-config
#select the Interfacing Options, then enable I2C
Then, to get full-resolution data, have a look at my other post on https://qrys.ch/reading-14bit-from-an-si7021-temperature-and-humidity-sensor/. It requires the use of the PiGPIO library and it’s daemon. To enable the PiGPIO daemon and get a test reading, do in the terminal:
# installing pigpio first
sudo apt-get install pigpio python-pigpio python3-pigpio

# get the Si7021.py script
wget http://abyz.me.uk/rpi/pigpio/code/Si7021_py.zip
unzip Si7021_py.zip

# start the pigpiod daemon; -l disables the remote socket interface, it's not needed to read a local sensor
sudo pigpiod -l

# start the main function in the module, as a test
python3 Si7021.py

# stop the daemon, if no longer used
sudo killall pigpiod
Posting to MQTT
The Eclipse Paho project provides open-source client implementation of MQTT, which I use here, because it’s simple and allows to publish single messages with a single line of code.
First, make sure the library is available to your Raspberry Pi.
# Installing python3 (if not available, e.g. in Raspian Lite)
sudo apt-get install python3

# Installing pip (if not available)
sudo apt-get install python3-pip

# The WordPress XML-RPC API
pip3 install paho-mqtt

# For YAML configuration
pip3 install pyyaml
This will install the python client library for publishing to a MQTT broker, using an import and a single line of python code:
# Post the data to an MQTT topic
import paho.mqtt.publish as publish

publish.single("topic", payload="data", hostname="host");
Put the parts together
Now, for a working weather station, you’ll need
- a bash script that starts the pigpiod daemon and invokes the measurement python script
- The Python script then initiates a masurement and sends the results to a WordPress blog, using a YML configuration.
You’ll find all of it in the from the WeatherVue GitHub Repository, in the publish folder.
Installation
To install the weather station from scratch, after the Raspberry Pi, the sensor and a MQTT broker have been prepared, you can just clone from the from the WeatherVue GitHub Repository:
# get git (Not included in the raspian lite version)
sudo apt-get install git

# clone the WeatherPress repo
cd /home/pi
git clone git://github.com/suterma/WeatherVue
cd WeatherVue/publish
sudo chmod u+x RunWeatherPublish.sh
Provide the MQTT topic and broker host in WeatherVue.config.yml.
sudo nano WeatherPublish.config.yml
The you can test out the weather station:
./RunWeatherPublish.sh
Post periodically
The weather station should post a new value e.g. every 2 minutes. (For details see how to run scripts from the terminal using this guide.)
Open crontab for the current user:
crontab -e
In the crontab file, add the following line to change directory to the WeatherVue clone and start it:
*/2 * * * * cd /home/pi/WeatherVue/publish && ./RunWeatherPublish.shDisplay
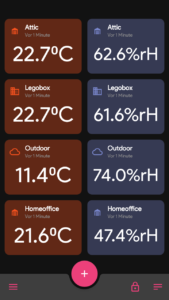
To actually show the values you need an MQTT client. I’ve written a simple web client that can be served via static files. See the “subscribe” folder on the WeatherVue GitHub repository or a live example at https://weathervue.qrys.ch.

Also, HiveMQ offers a web based client, or you can use an app like MQTT Dasboard:
Credits
Most of this work is based on other people’s work, notably:
- PIBITS: Raspberry Pi and SI7021 sensor example
- Joan at abyz.me.uk: Si7021 reader and PiGPIO daemon
- Paho Python Client, a MQTT Python Client (dual Eclipse License)
- HiveMQ, offering a free MQTT broker
See also the Github Repository.