
I recently started the development of a vue3 application (web.replayer.app) and wanted to explore how to automatically (a.k.a continuously) build and deploy from my GitHub repository to my online test environment. Azure Pipelines seems to be an easy way to do it.
My experience is, if it builds locally, it also builds in the cloud. In fact, with a typical setup for a VueJs application, most parts are already in place. To use Azure Pipelines you additionally need to:
- Have a DevOps organization
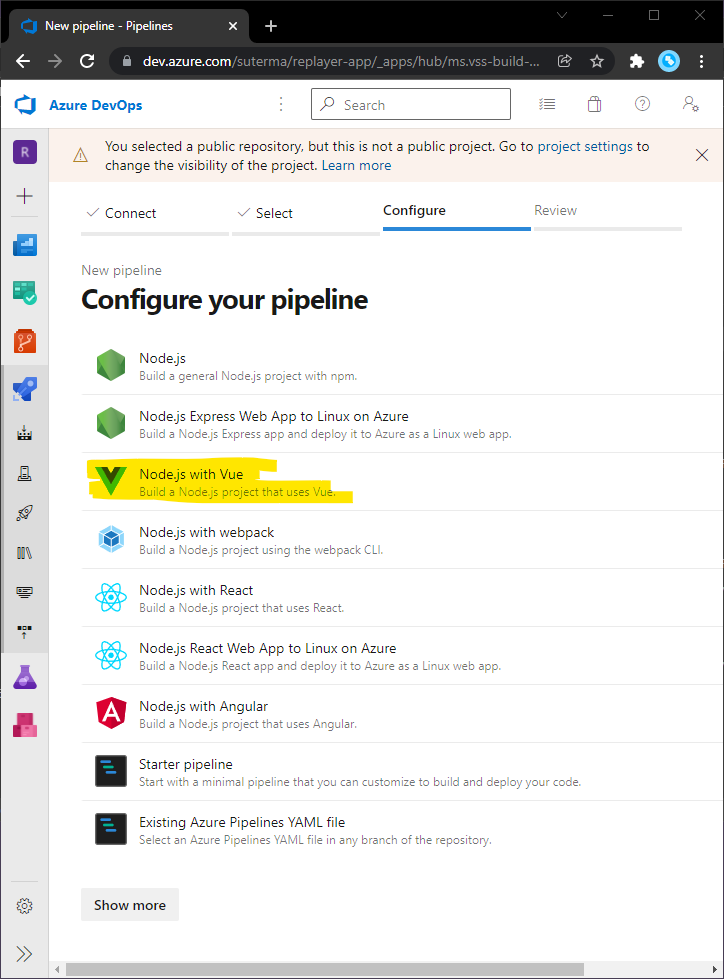
- Create a new Pipeline with the “Node.js with Vue” template for your Repository
- Make sure you have setup at least 1 Parallel Job
- Optionally, add a test task and test report to the pipeline config
- Add a deployment step
Create an Azure Pipeline
I already have an Azure subscription, but creating an Azure pipeline is free for a public GitHub repository anyway . I only needed to choose an organization name, create a project and follow this guide from Microsoft.
Following this path, you will need to give Azure quite some access to your Repository, with the OAuth authentication scheme, including admin access for webhooks, of course, but also to all repositories, including private ones, with write access.
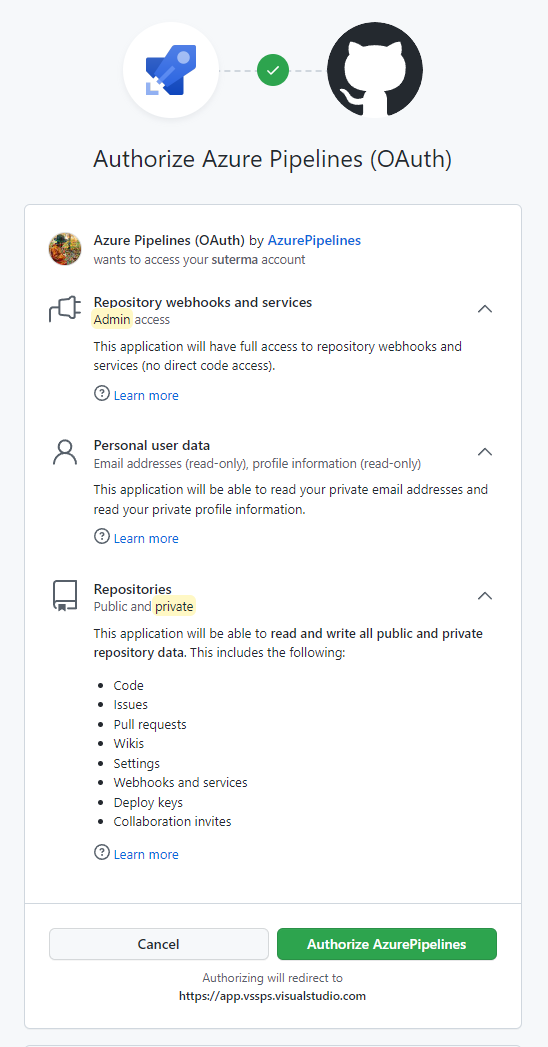
To learn more about the specifics of access control and how to best structure the projects in Azure Dev Ops, read this article about how to Build GitHub repositories. There is also a section addressing the permission requests for the OAuth access as show in the image above.
Note: For me, the security policy of the newly created organization was set to not “Allow public projects”. You may want to change that, as it impacts your choices on parallel jobs later on.
- After selecting the repository and installing the suggested GitHub App into your new pipeline for it, select “Node.js with Vue”:
- Click “Save and run”, and commit the resulting yaml file to your repo.
- Evaluate the results
If you are lucky enough you already get the green checkmark, indicating a successful build:

Parallel Jobs
Initially, I got an error saying
##[error]No hosted parallelism has been purchased or granted. To request a free parallelism grant, please fill out the following form https://aka.ms/azpipelines-parallelism-request
The problem is, in my case, the project was set up as private, and no Microsoft-hosted “Parallel jobs” were assigned, and no Self-hosted job was set up.
How to set up “Parallel jobs”
Depending on how your project is set up (private or public) and depending on your hosting requirements (Microsoft- or self-hosted), you need to set up parallel jobs. In any case you need at least one, even if you do not actually need to run multiple jobs at the same time in a pipeline.
Basically you have two options:
- Using self-hosted parallel jobs, which involves you setting up your own machine as an agent, with the required software.
- Using a Microsoft hosted agent.
For public projects, with public source code from GitHub, you can apply for free grant, using the link mentioned in the error message. I did this and was approved the next day.
Testing
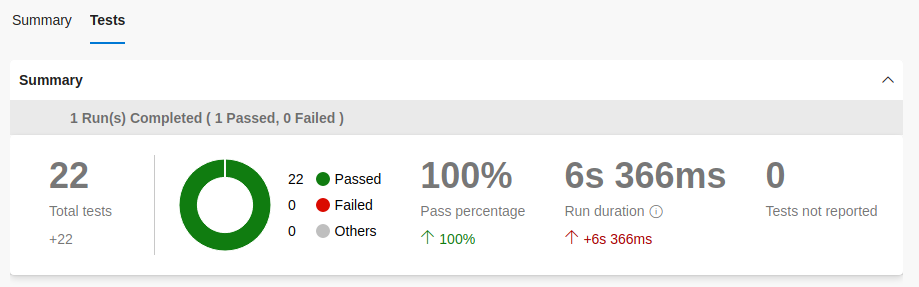
Within my project, I am using Jest as my JavaScript (unit) testing framework. To run the unit tests within Azure Pipelines and have published test results, I installed the jest-junit npm package and configured it like this in package.json:
    "scripts": {
        "test": "jest --ci --reporters=default --reporters=jest-junit",
    },
This creates the output as junit.xml in the root folder of the project. To actually have the Azure Pipeline publish the results I added a test task to the end of my azure-pipelines.yml file:
    - task: PublishTestResults@2
      condition: succeededOrFailed()
      inputs:
          testRunner: JUnit
          testResultsFiles: '**/junit.xml'
A successful run then publishes the test results alongside the pipeline’s summary tab:
Creating the artifacts
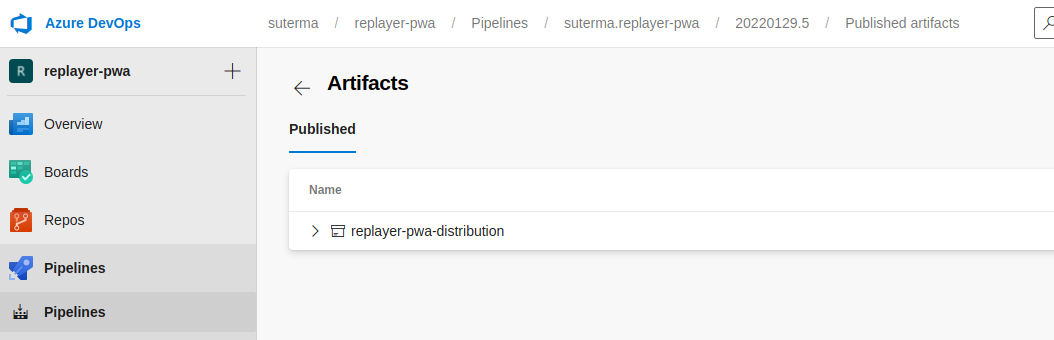
My project creates a dist folder, containing the complete web app, which can be deployed. I used another task to create an artifact at the end of my azure-pipelines.yml file:
    - task: PublishPipelineArtifact@1
      inputs:
          targetPath: $(System.DefaultWorkingDirectory)/dist
          artifactName: replayer-pwa-distribution
This now creates an artifact, with each pipeline run, related to the run itself. Note: it’s not published in the “Artifacts” for the project, but in the published artifacts for the run:
Skipping unnecessary files
I build the stats.json file for analyzation with the webpack-bundle-analyzer. While useful for observing dependencies and build size, it’s of no use in the distribution. With an .artifactignore file I am skipping over it for the artifact:
# An ignore file for the Azure pipeline artifact
# Statistics are not used in the distribution
stats.json
This artifact can now get deployed to the web space, either manually or with a release pipeline.
Deploying to the web space
Typically you use a separate release pipeline for releasing build artifacts. However, it’s also possible to directly deploy build output from the build pipeline. For simplicity, this is how I deploy my build here, into my “devel stage” test environment only.
Azure Pipelines offers two options for deploying to an external (non-Azure) server:
- SSH-based access, with both an SSH key or a credential based option.
- FTP/SFTP based file transfers
Because my hosting provider‘s SSH option just gives global access, I chose to use the FTP Upload task, with a specific user for the path I want to deploy into. This is the (example) task I added to the end of my azure-pipelines.yml file:
    # FTP upload the build output
    # Note: This does not honor the .artifactignore file
    - task: FtpUpload@2
      inputs:
          credentialsOption: 'inputs'
          #The FTP server URL must begin with ftp:// or ftps://
          serverUrl: 'ftps://example.cyon.net'
          username: 'example-user@example.cyon.net'.
          password: 'super-long-and-secure-password'
          rootDirectory: $(System.DefaultWorkingDirectory)/dist
          # Deploy all except the stats.json
          filePatterns: '**/!(stats.json)'
          #Just use the defined root for the FTP user
          remoteDirectory: '/'
          #keep the directory, as it's the root anyway
          clean: false
          #removing content does not work, because I have static files that are not allowed to access for this upload task
          cleanContents: false
          preservePaths: true
Note that this does not honor the .artifactignore file. Thus I specify the minimatch file matching pattern to exclude the stats.json file likewise.
Also, you should not expose the password in the azure-pipelines.yml directly (like in this example), but use secret variables.
Summary
Azure Pipelines is a straightforward and free solution for a CI/CD (for public projects). After initial setup of the organization and project, the build pipeline is completely configurable with a single YAML file. Here’s my full azure-pipelines.yml file, incorporating all steps from above:
# Build Pipeline for replayer-pwa

trigger:
    - main

pool:
    vmImage: ubuntu-latest

steps:
    - task: NodeTool@0
      inputs:
          versionSpec: '10.x'
      displayName: 'Install Node.js'
    # Building the package
    - script: |
          npm install
          npm test
          npm run build
      displayName: 'npm install and build'
    # Publishing the test results
    - task: PublishTestResults@2
      condition: succeededOrFailed()
      inputs:
          testRunner: JUnit
          testResultsFiles: '**/junit.xml'
    # Publishing the build pipeline artifact (optional)
    # This honors the .artifactignore file
    - task: PublishPipelineArtifact@1
      inputs:
          targetPath: $(System.DefaultWorkingDirectory)/dist
          artifactName: replayer-pwa-distribution
    # FTP upload the build output
    # Note: This does not honor the .artifactignore file
    - task: FtpUpload@2
      inputs:
          credentialsOption: 'inputs' # Options: serviceEndpoint, inputs
          #The FTP server URL must begin with ftp:// or ftps://
          serverUrl: 'ftps://example.cyon.net'
          username: 'example-user@example.cyon.net'.
          password: 'super-long-and-secure-password'
          rootDirectory: $(System.DefaultWorkingDirectory)/dist
          # Deploy all except the stats.json
          filePatterns: '**/!(stats.json)'
          #Just use the defined root for the FTP user
          remoteDirectory: '/'
          #keep the directory, as it's the root anyway
          clean: false
          #removing content does not work, because I have static files that are not allowed to access for this upload task
          cleanContents: false
          preservePaths: true
Read the Build, test, and deploy JavaScript and Node.js apps guide for more details.
For reference, you can access the public pipeline runs for my example project above: https://dev.azure.com/suterma/replayer-pwa/_build?definitionId=1